Mastering Data Insights with Google Analytics: A Step-by-Step Guide by Strike
At Strike, we understand that data is the driving force behind smart business decisions. To ensure you're getting the most from your data, we've put together this detailed guide to help you set up and optimize Google Analytics 4 (GA4).
Dr Uthara Nair
1 Oct 2024
GA4 is the future of analytics. You’ve probably heard the buzz, but let me break it down in a way that actually matters to your business. Gone are the days of fragmented data and missing insights—Google Analytics 4 (GA4) is here to unify the way you track interactions across your site and apps, giving you a clear, actionable picture of what your users are doing.
But let’s be real—if you’ve been relying on Universal Analytics (UA), making the jump to GA4 can feel like a big leap. Don’t worry, I’ve got you. I’ll guide you through exactly what’s different and how to get the most out of this powerful tool.
What Sets GA4 Apart?
GA4 is all about flexibility and depth. It rethinks how user behavior is tracked by treating everything as an event—whether someone clicks on a button, watches a video, or completes a purchase. In Universal Analytics, you had different “hit types” (like page views or events) which fragmented the data. GA4 simplifies it all by treating every interaction equally.
This new approach means you get a clearer view of how users are interacting across multiple platforms, whether it’s your website, mobile app, or both. Say goodbye to the limitations of “views” in UA. GA4 introduces data streams instead, allowing you to consolidate data from various sources into a single property. Imagine seeing how users move seamlessly between your app and site without missing a beat—that’s what GA4 enables.
Oh, and predictive analytics? Yep, GA4 can actually anticipate user behavior, giving you insights on things like potential churn or likelihood to purchase. This isn’t just tracking data—it’s learning from it.
Setting Up GA4: It’s Easier Than You Think
Transitioning to GA4 can seem like a headache, especially if you’ve been running UA for years. But I promise, the payoff is worth it, and the setup isn’t as complicated as it seems.
Here’s a quick guide to get started:
Create Your GA4 Account
First, log into your Google Analytics account (if you don’t have one, create it here). Once logged in, head over to the Admin section and select Create Account. Name your account and review the data-sharing options to make sure you're comfortable with how your data is handled.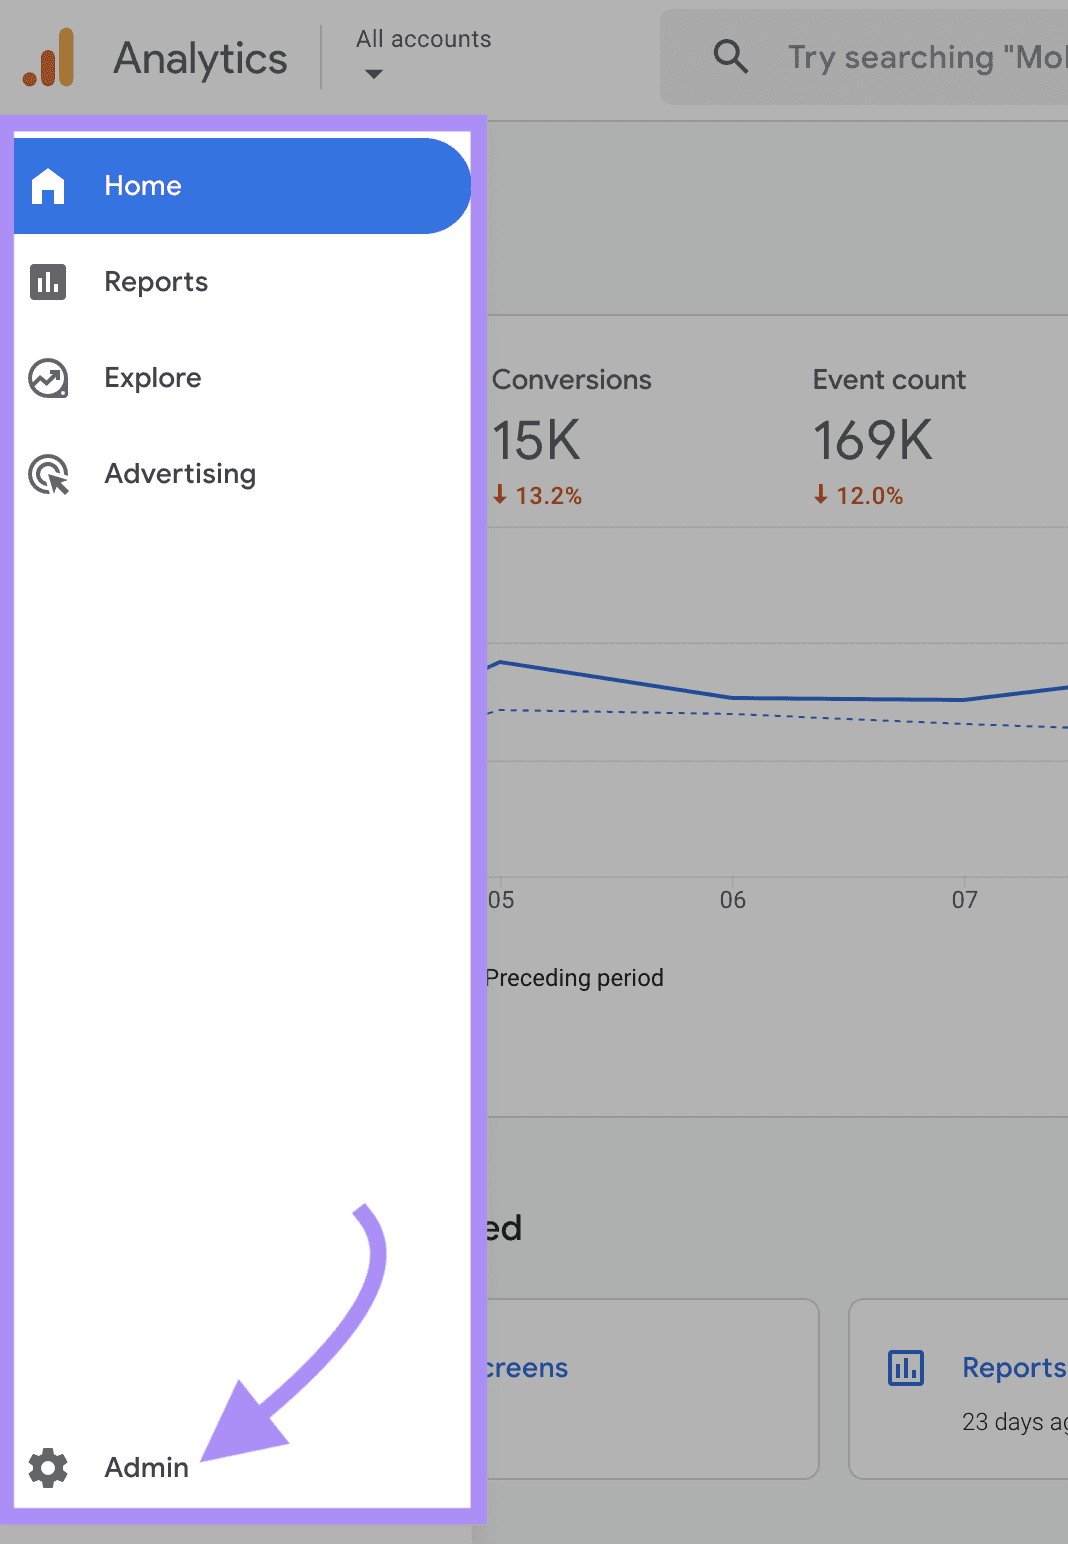
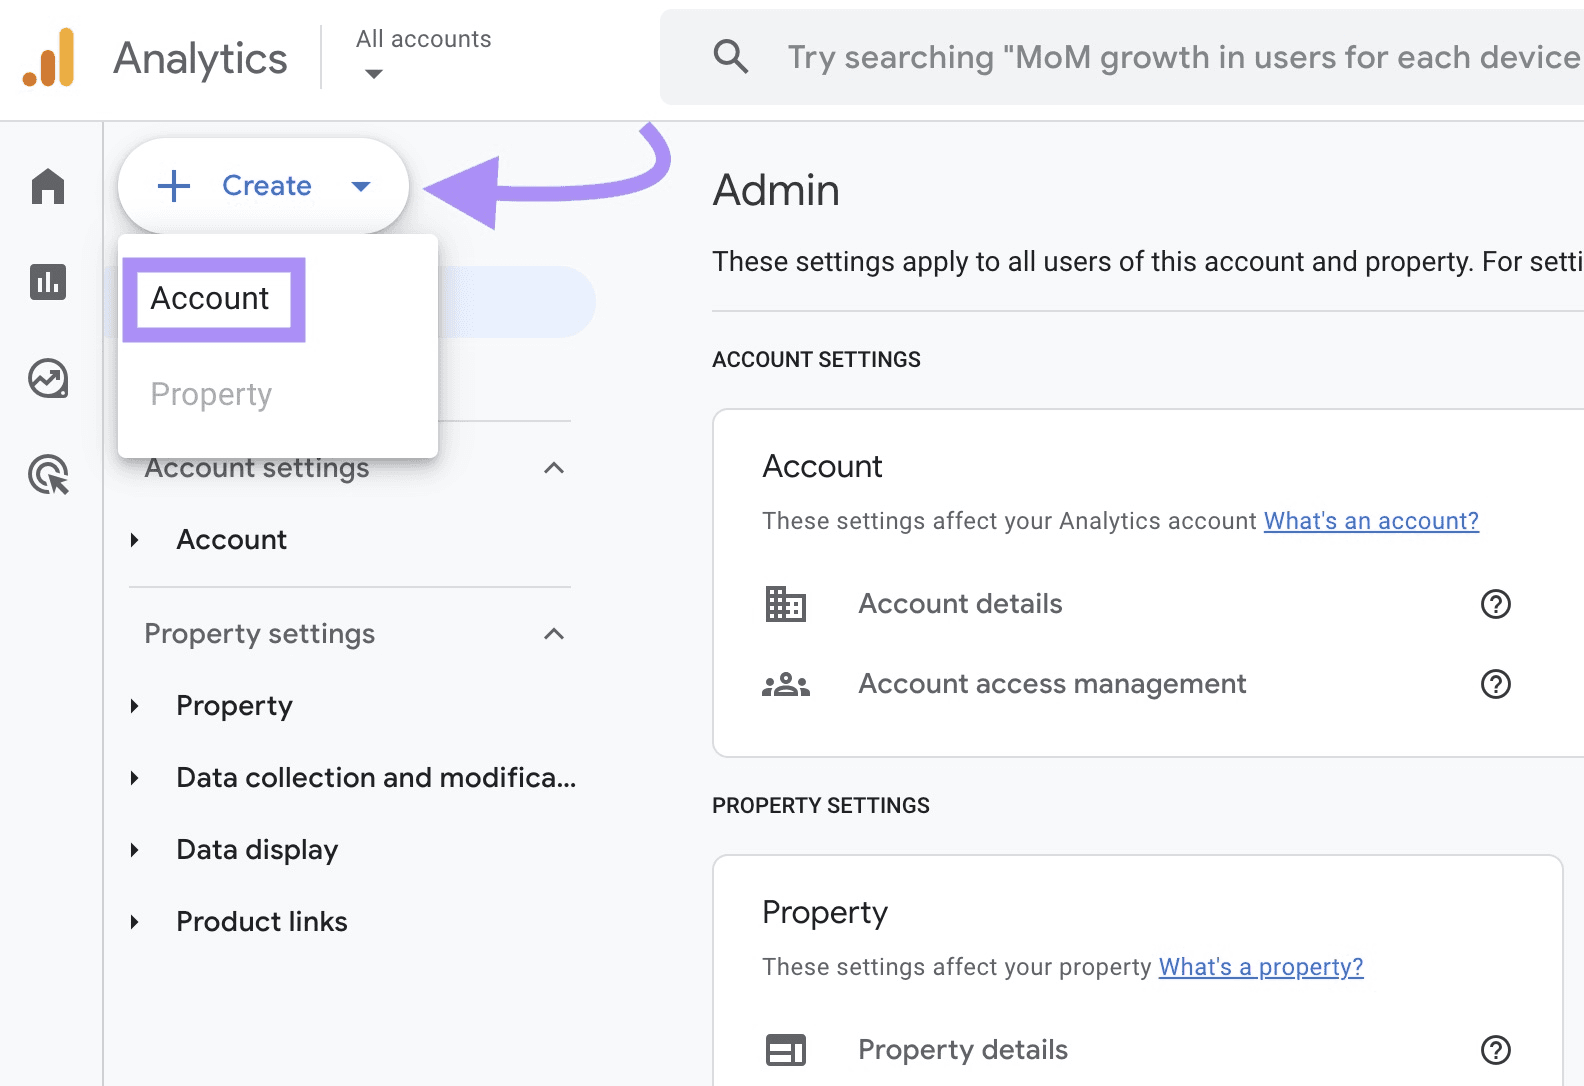
Set Up Your Property
A property is where all your data streams from various sources (website, app, etc.) will live. Name your property and choose your time zone and currency preferences for reports. You can always tweak this later, but it’s better to get it right upfront.Business Details and Objectives
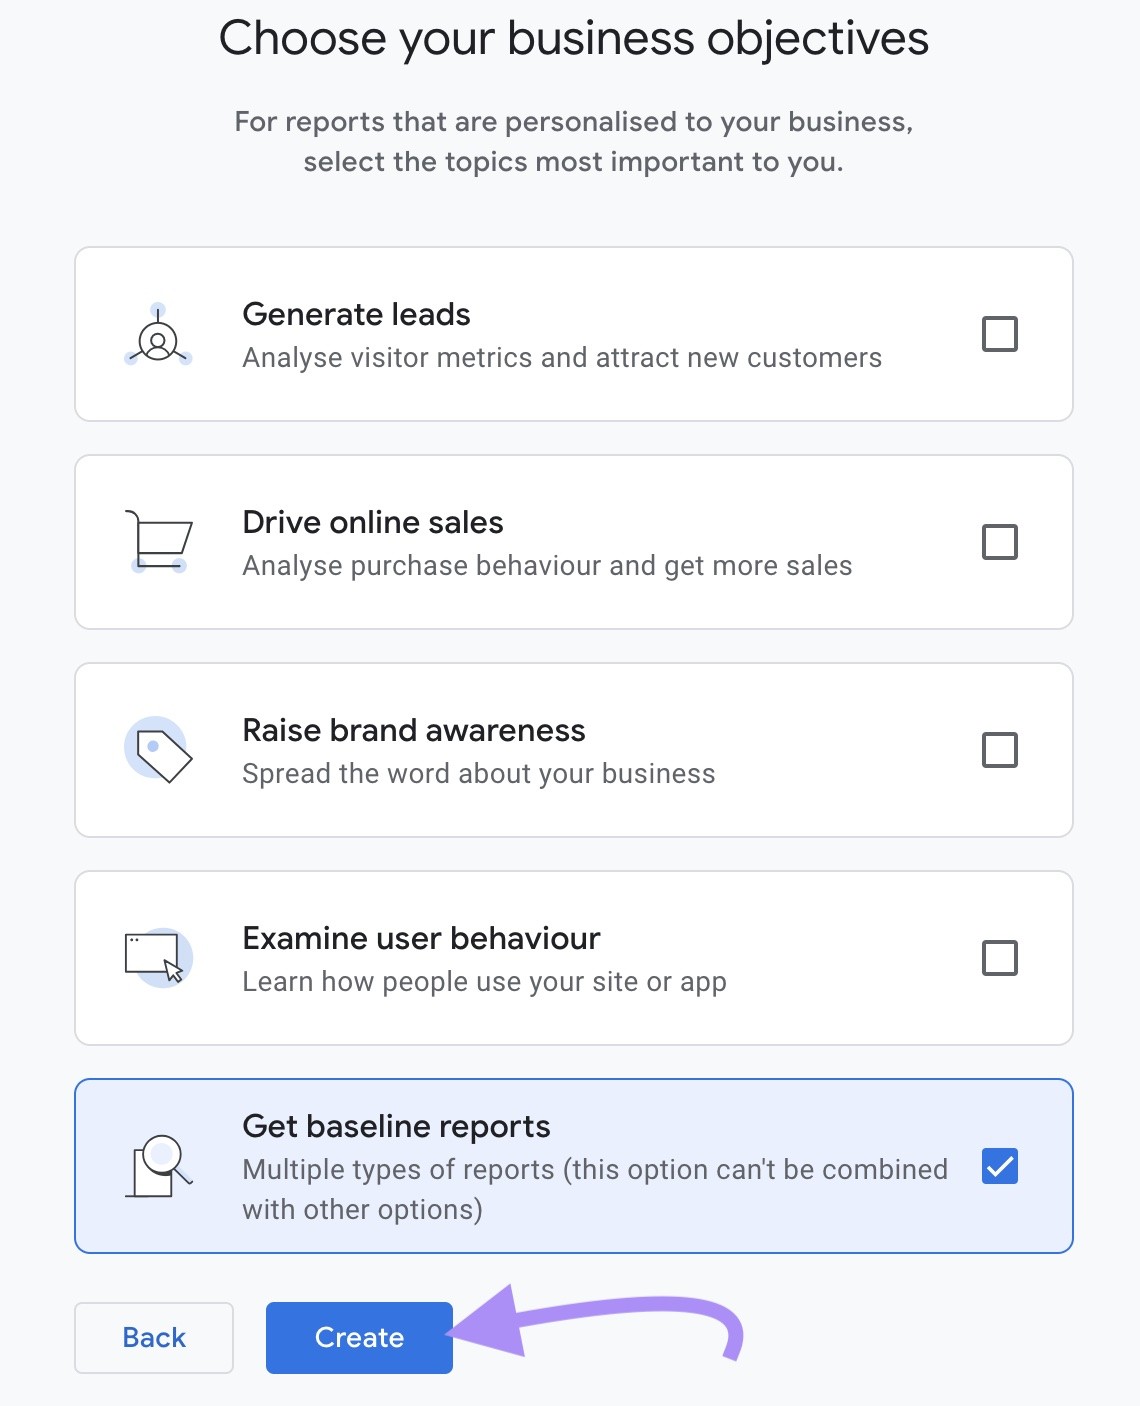
Input your industry category and business size. Then, select the objectives that matter most to you—whether it's increasing sales, growing user engagement, or something else. This helps GA4 tailor its reports to give you insights that are actually useful.If you select “Get baseline reports,” GA4 will provide a collection of reports for activity across the customer life cycle. Instead of providing reports tailored to a specific business objective.
Then, click “Create.”
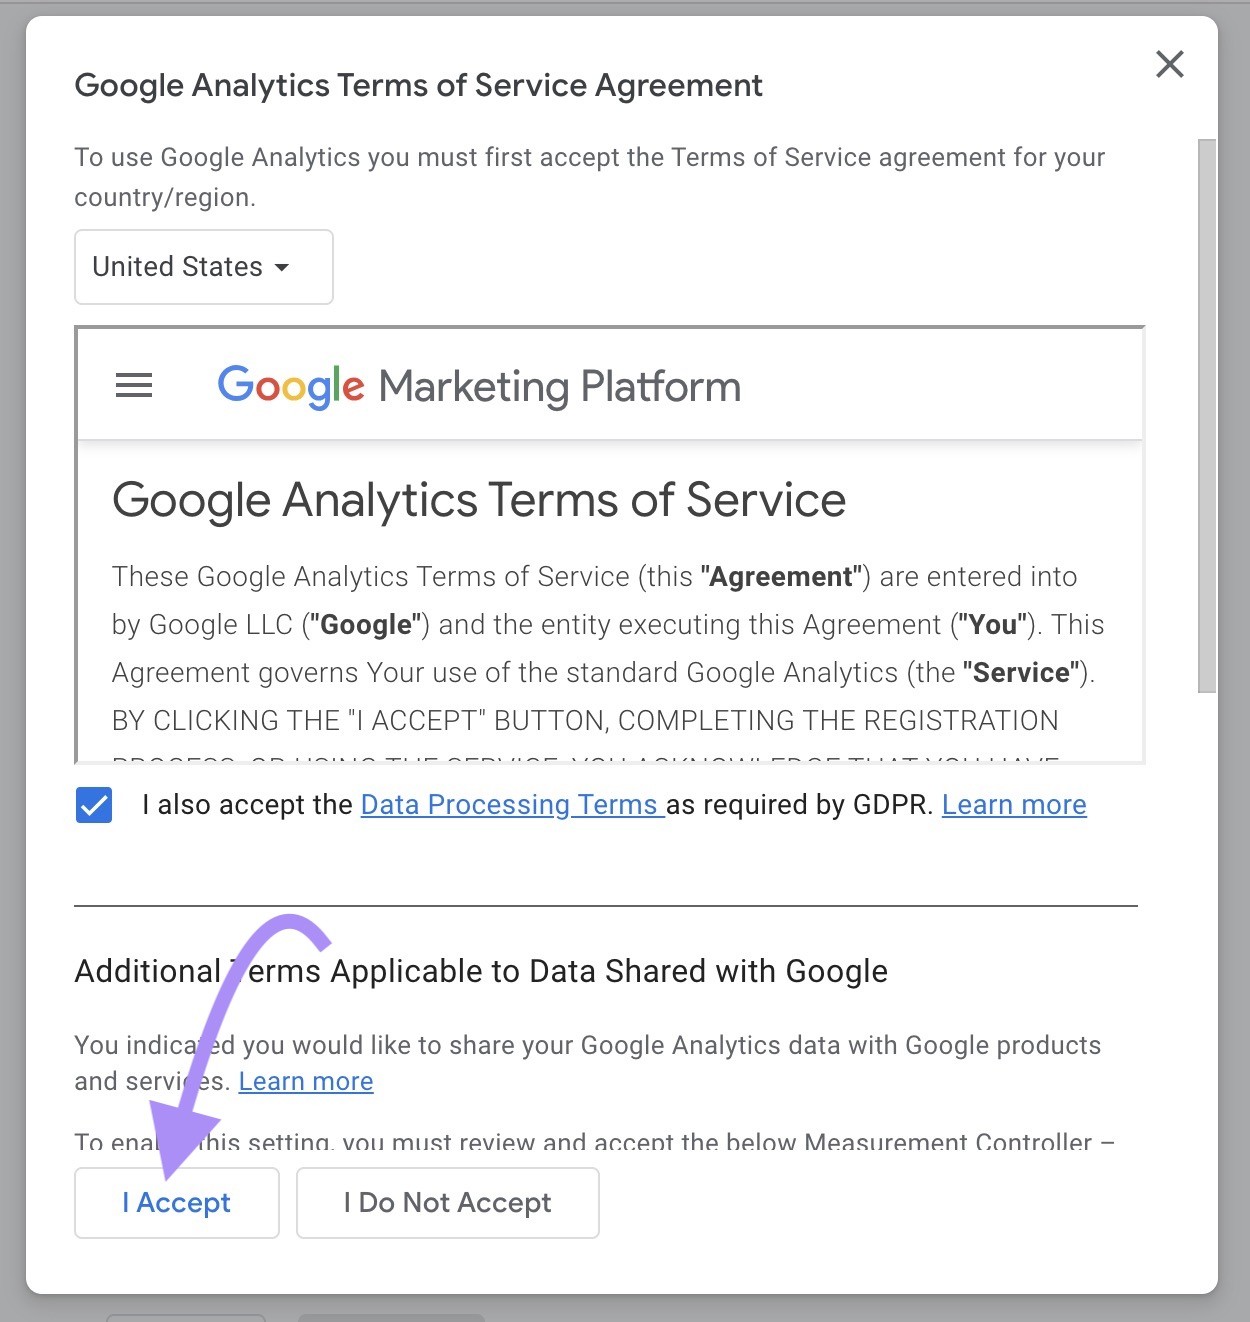
The Google Analytics terms of service agreement will appear on the screen. Adjust the country setting to view the appropriate agreement for your geographical region if you need to.
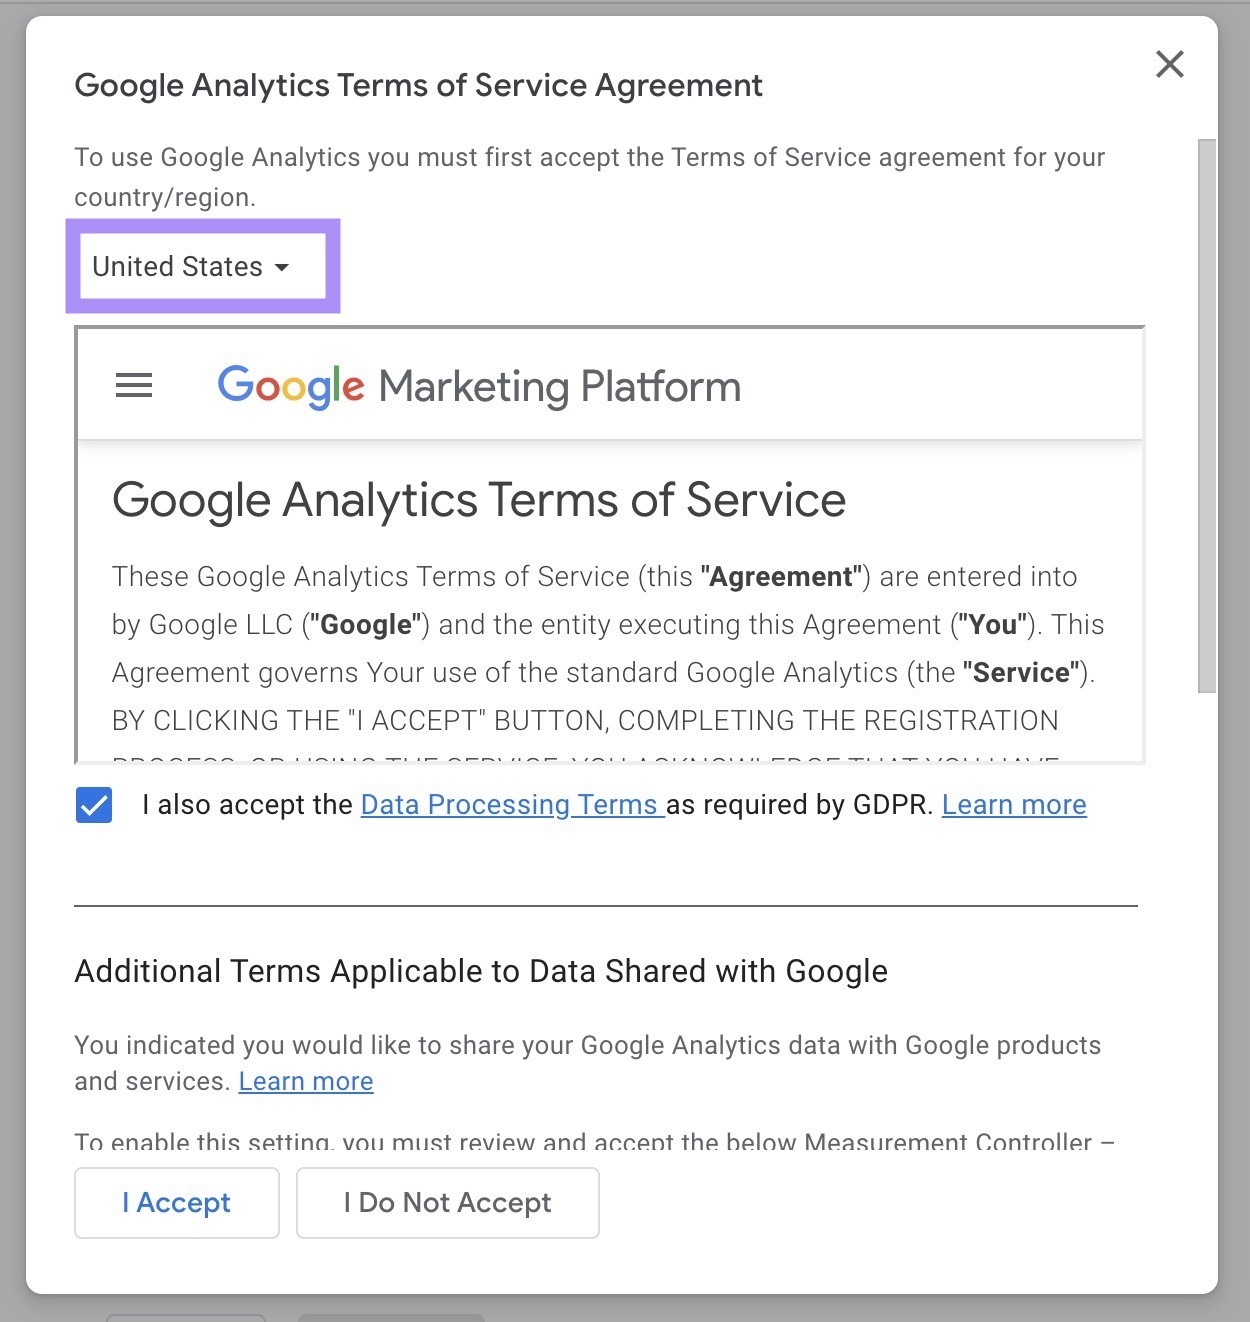
Review the terms of service. If you accept them, click “I Accept” to proceed to the next step.
Create a Data Stream
This is where the magic happens. Whether you’re tracking a website or app, GA4 creates a unique measurement ID to track interactions. Once you’ve created your data stream, you’ll need to add the tracking code to your site (or app). Don’t worry, if you’re using something like Google Tag Manager, this is super easy to implement.The final step is to create a data stream. Which will send data from your website or app to your GA4 property.
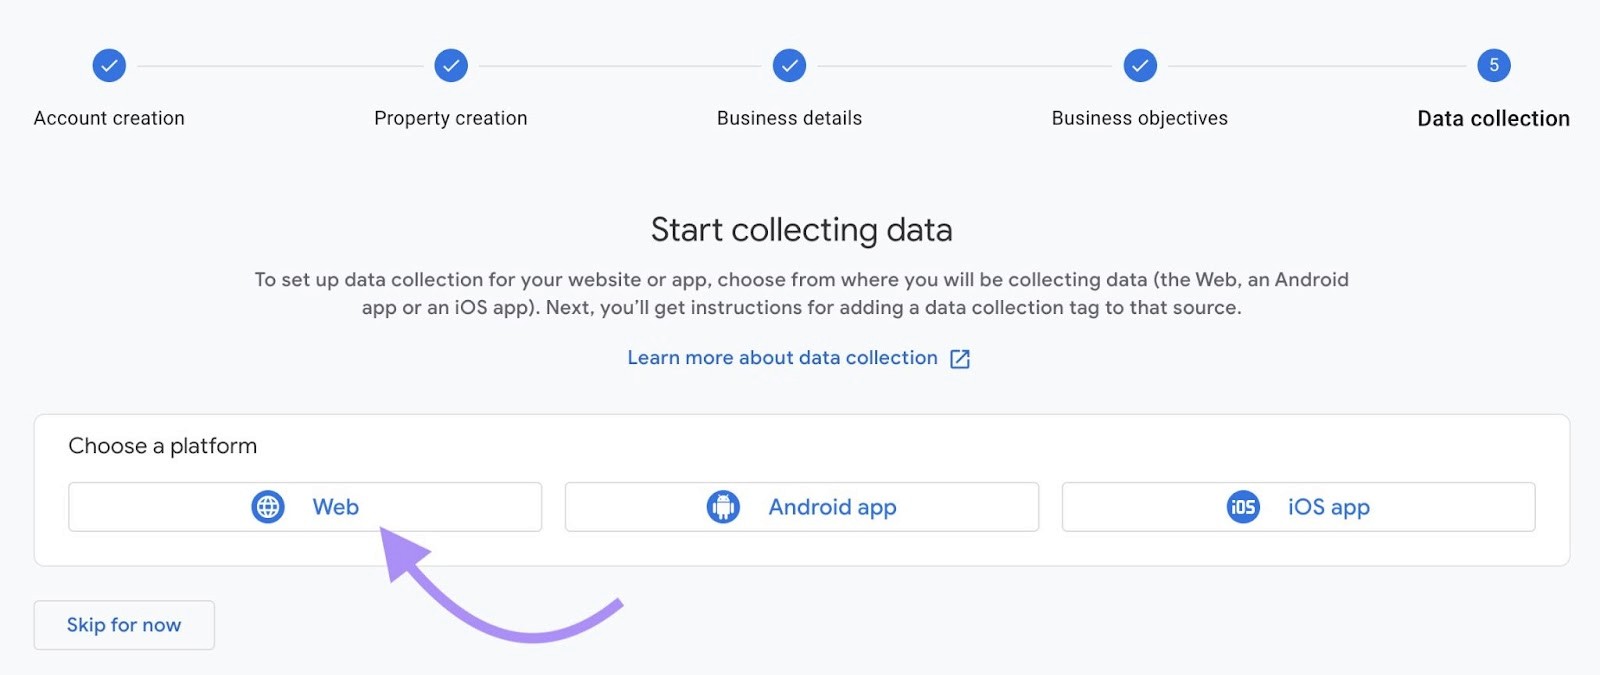
The steps for creating a data stream differ depending on whether your data source is a website, iOS app, or Android app.
To create a data stream from a website, click “Web.”
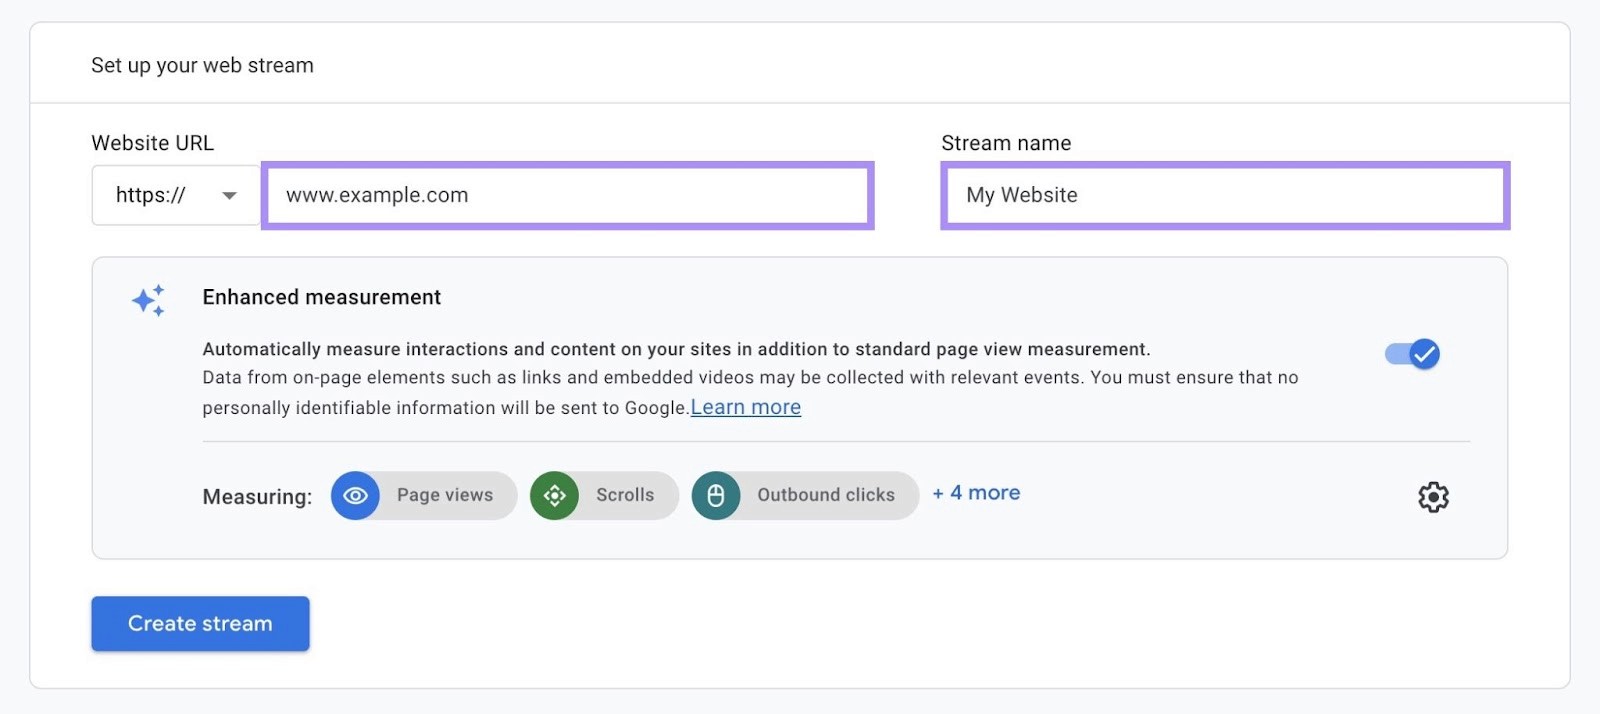
Type your domain into the “Website URL” field. And use the “Stream name” field to name your data stream.
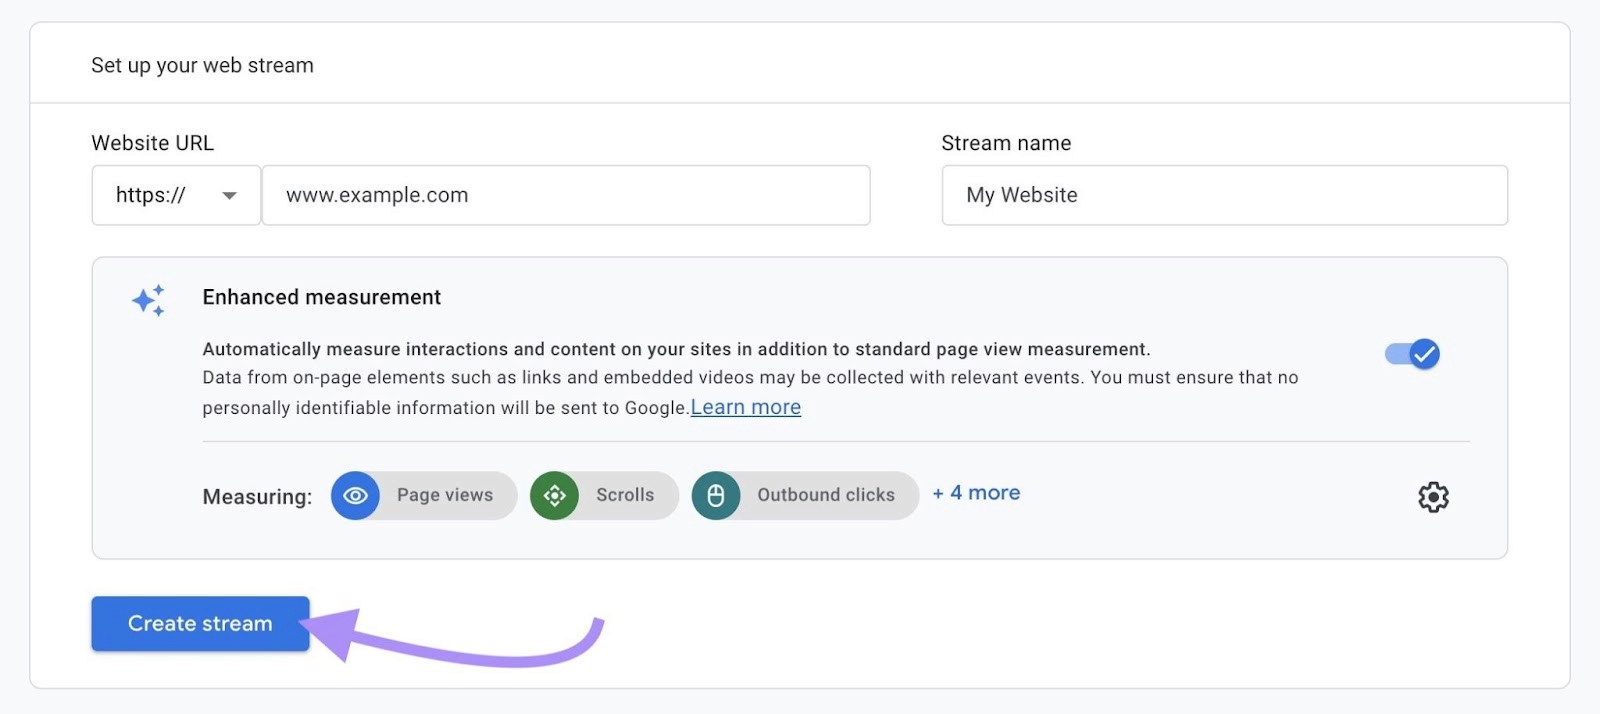
Then click “Create stream.”
A window will slide in, showing your data stream’s measurement ID and other details.
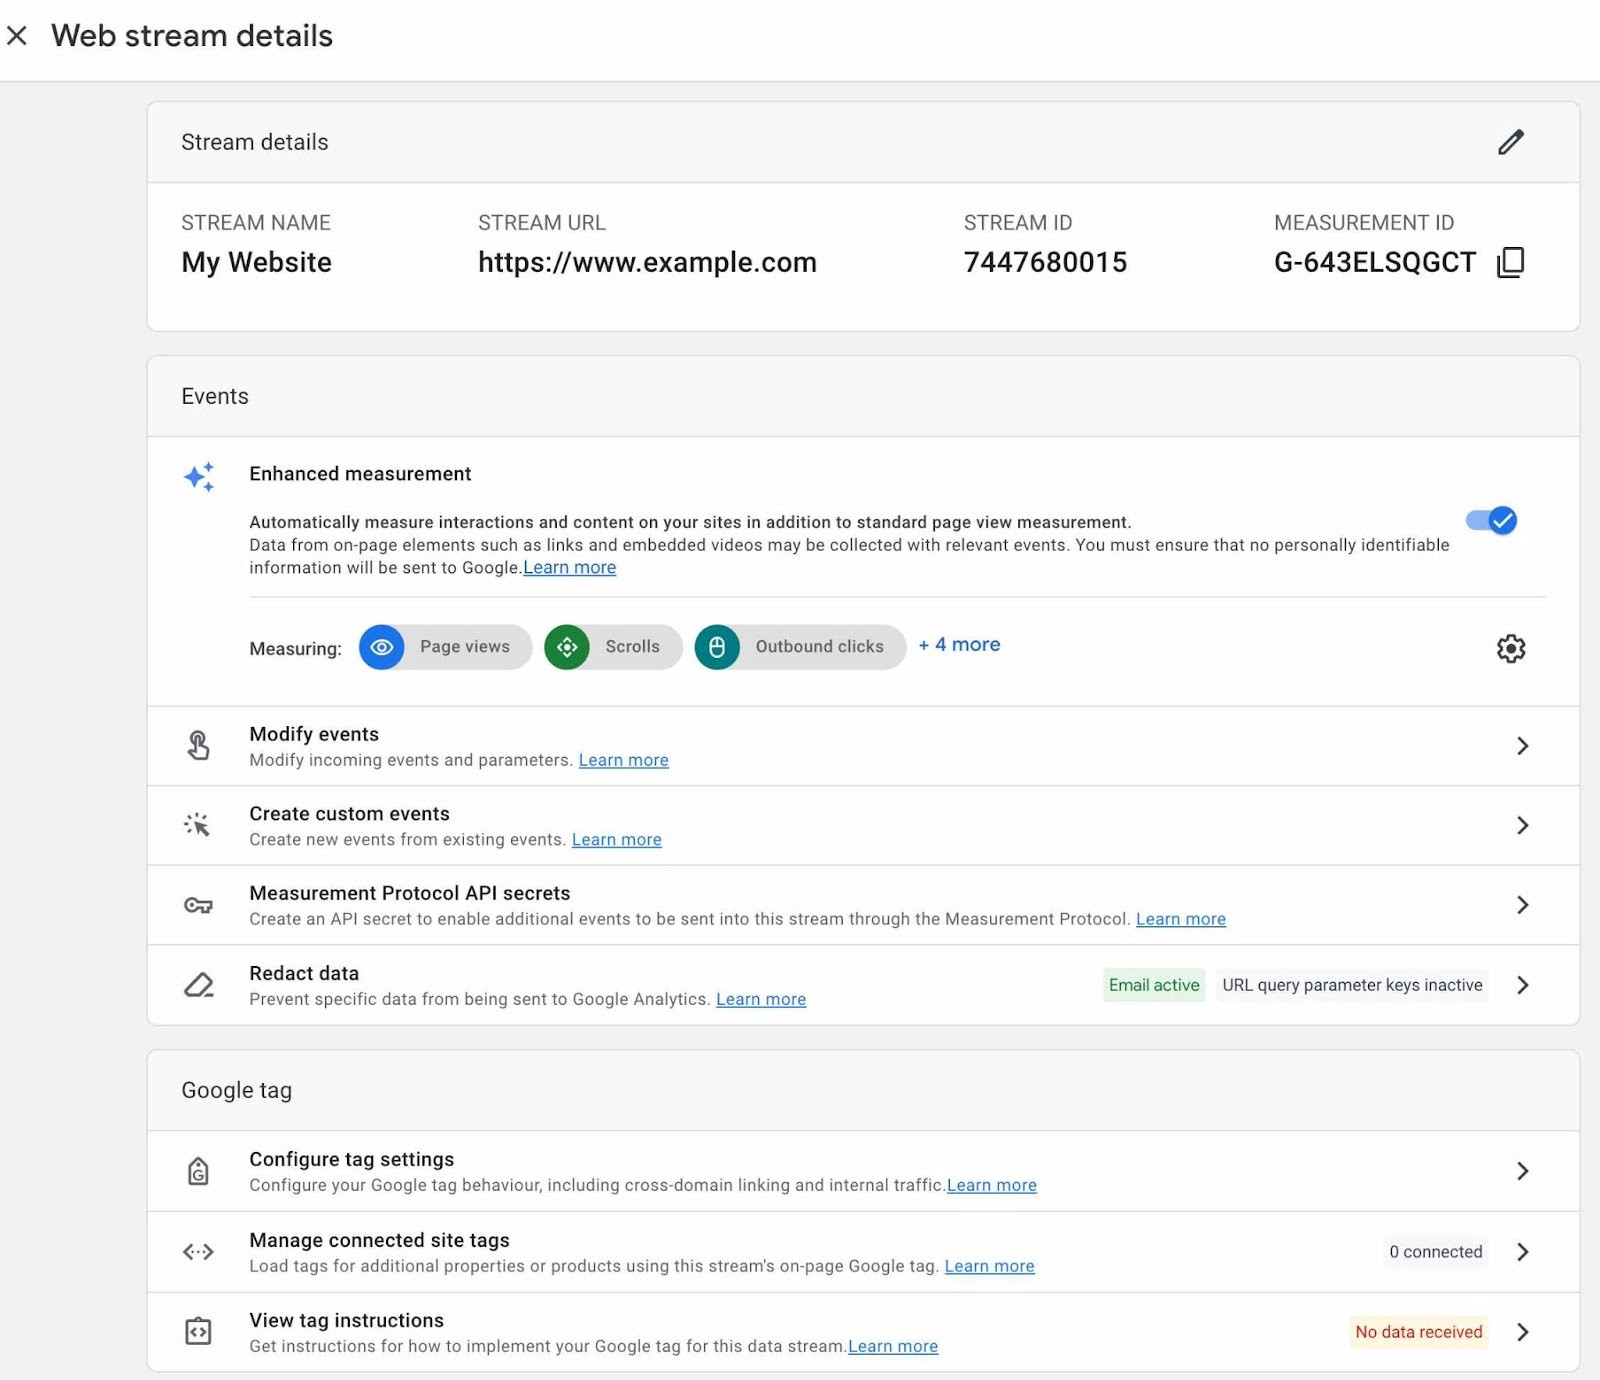
Save the measurement ID to a text file for convenient reference—you may need it later.
After creating the data stream for your website, the next step is to install GA4 on it.
Installing GA4 on Your Website: Three Options
Now, let’s talk installation. There are three main ways to get GA4 tracking set up, depending on your site:
Google Tag Manager (GTM)
If you’re already using GTM, you can simply add a new GA4 tag to your container. This method gives you the flexibility to manage all your tags in one place, without touching your website’s actual code. It’s seamless, efficient, and highly recommended.Select your website’s GTM container.

Click the “Add a new tag” option on your container’s workspace overview.

Click “Untitled Tag” to give your tag a name, like “GA4 Setup”:
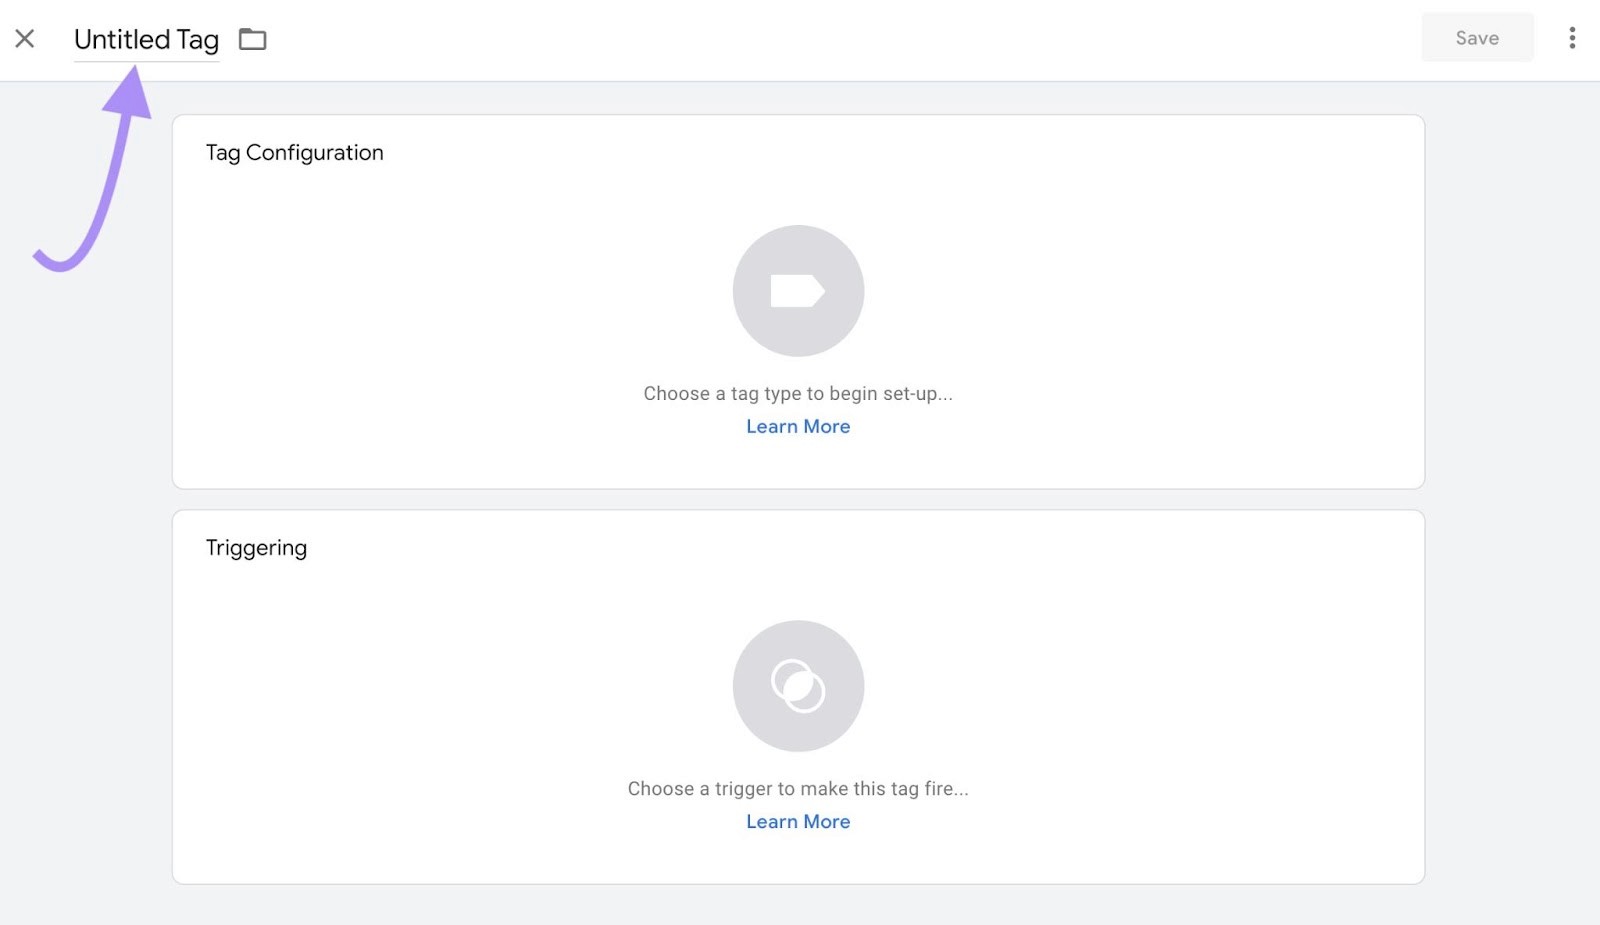
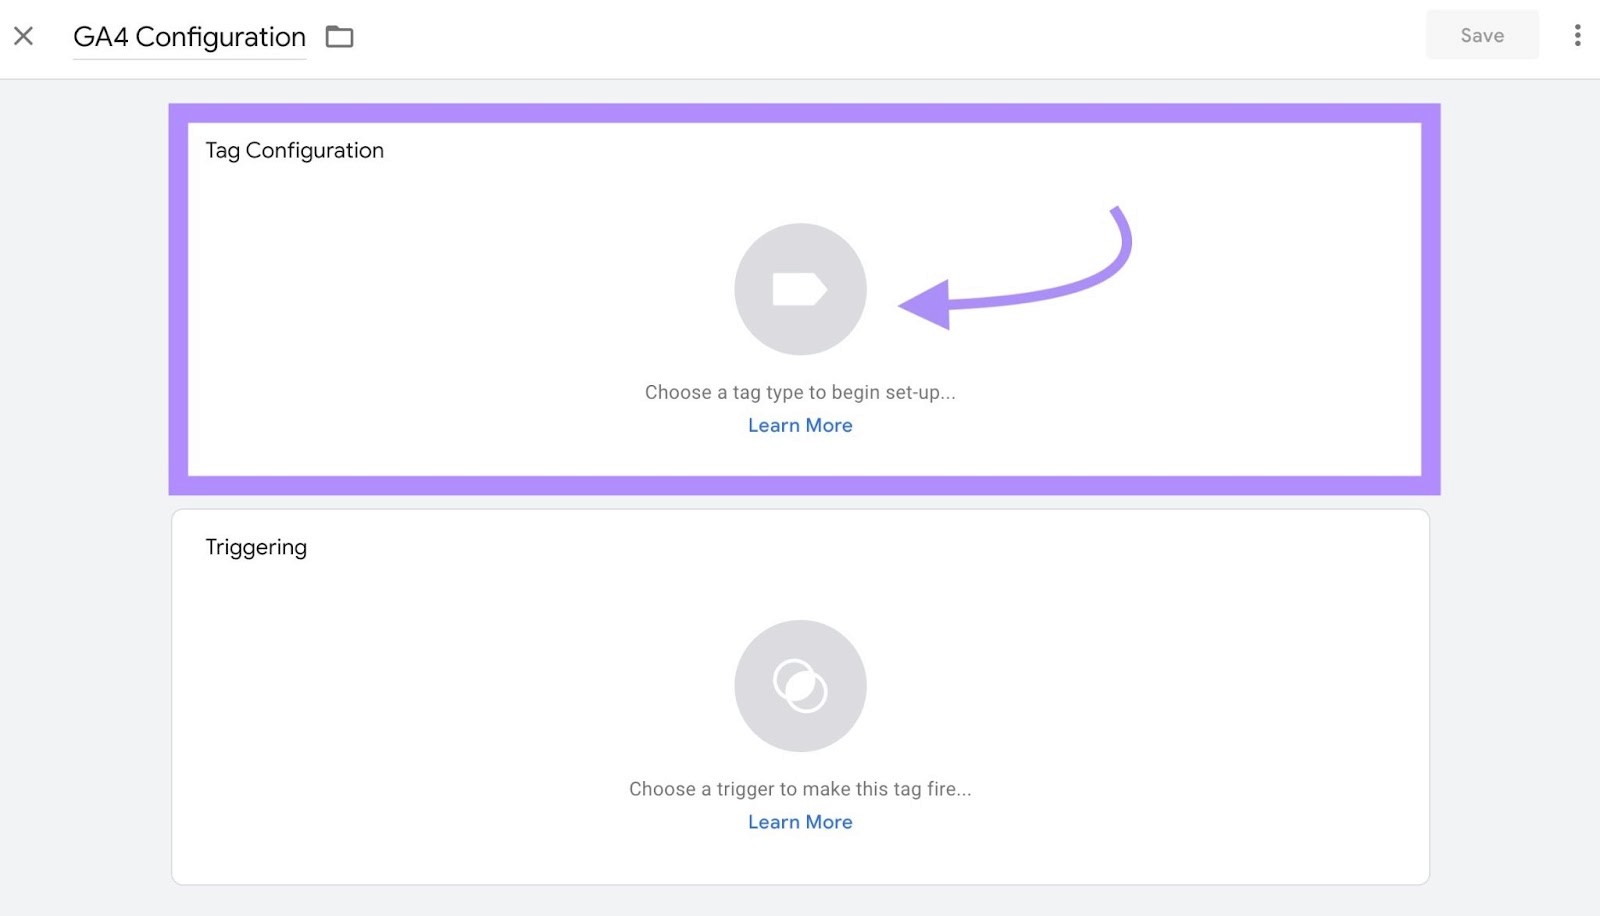
Then, click anywhere in the “Tag Configuration” panel.
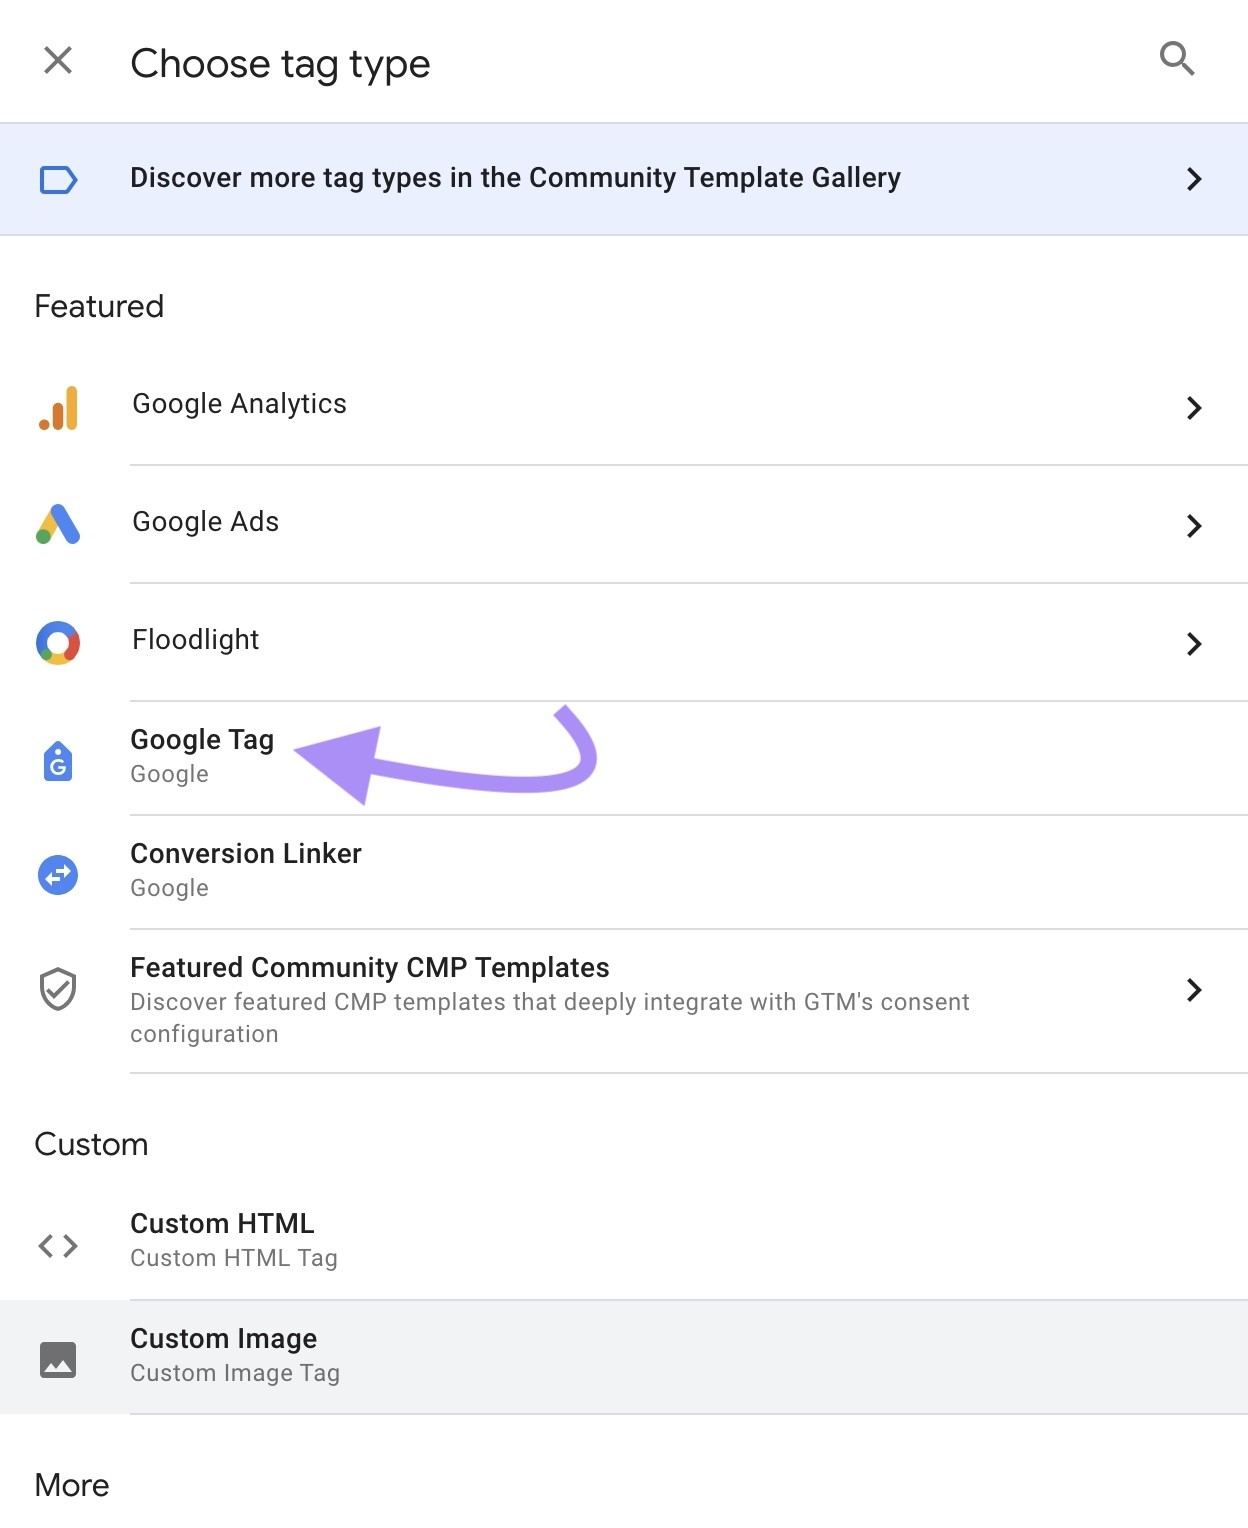
From the “Choose tag type” window that slides in, select “Google Tag.”
Fill out the “Tag ID” field with your GA4 data stream’s measurement ID. If you haven’t saved your measurement ID after creating your data stream, learn how to find it here.
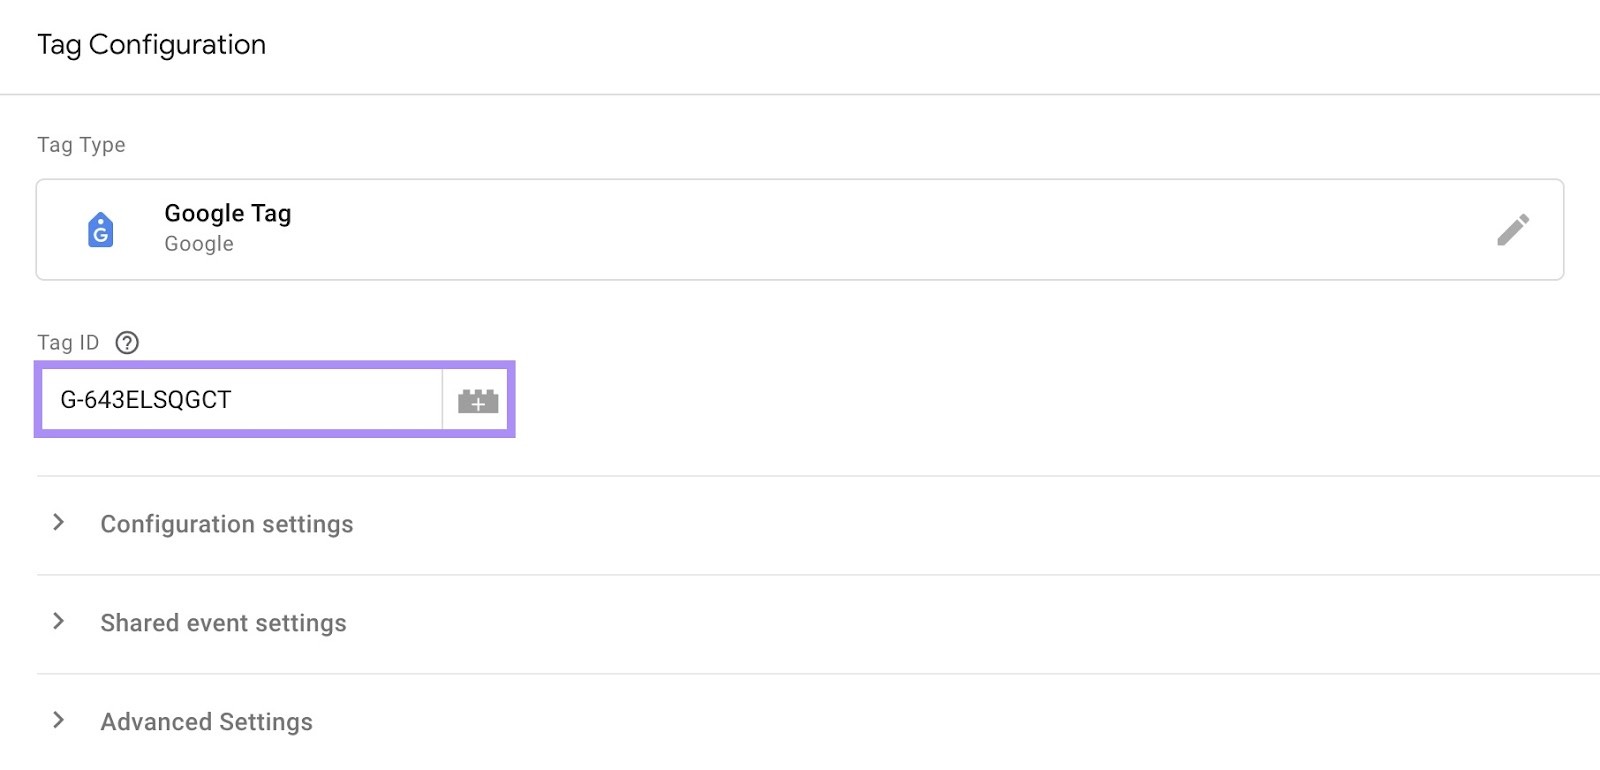
After that, optionally adjust your tag’s configuration, shared event, and advanced settings.
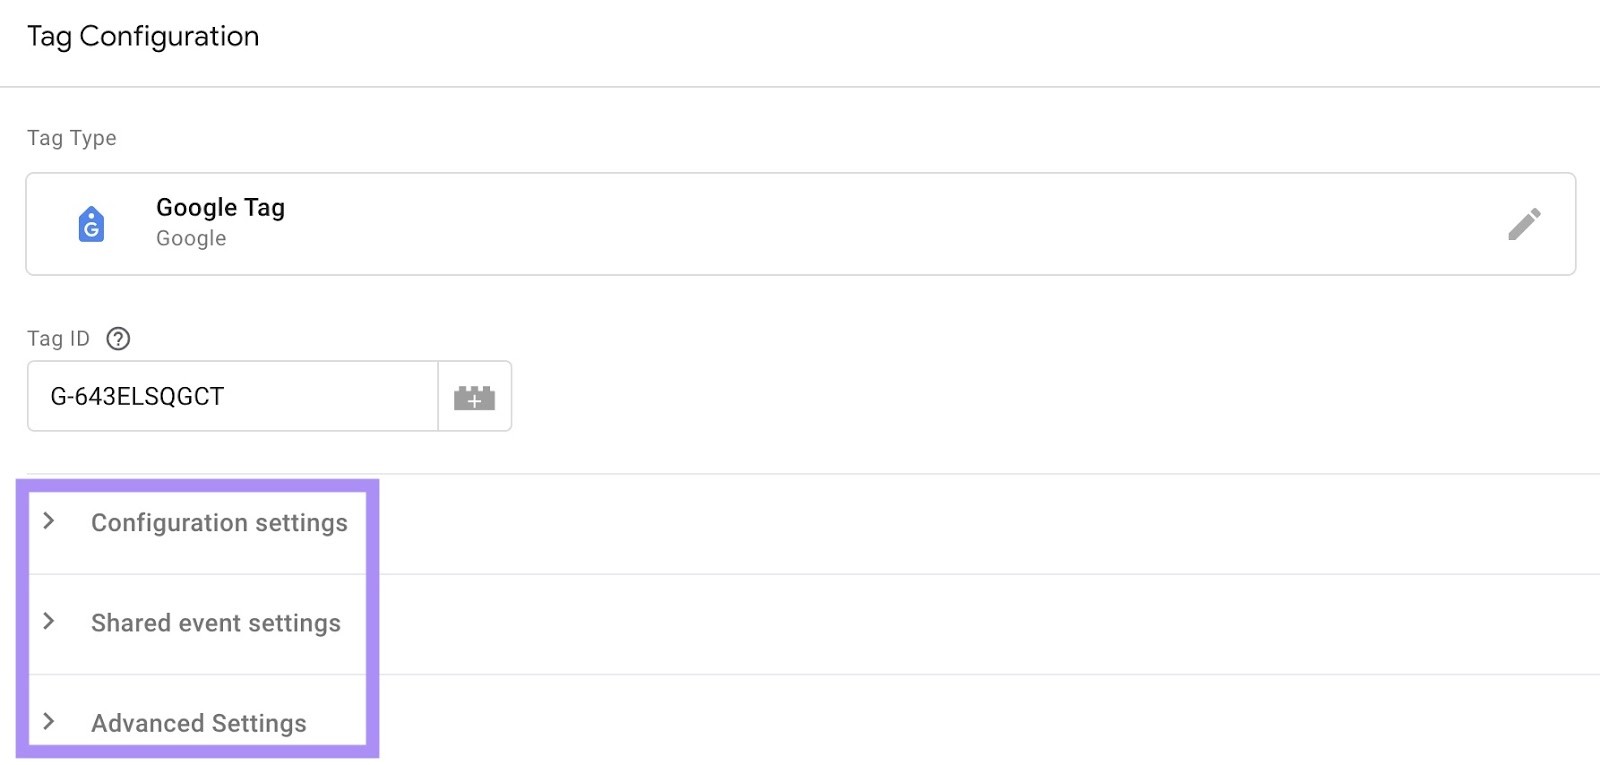
When you’re done, click anywhere in the “Triggering” panel to set up when GTM should “fire” (or load) the GA4 tag. So the tag will send data from your website to GA4.
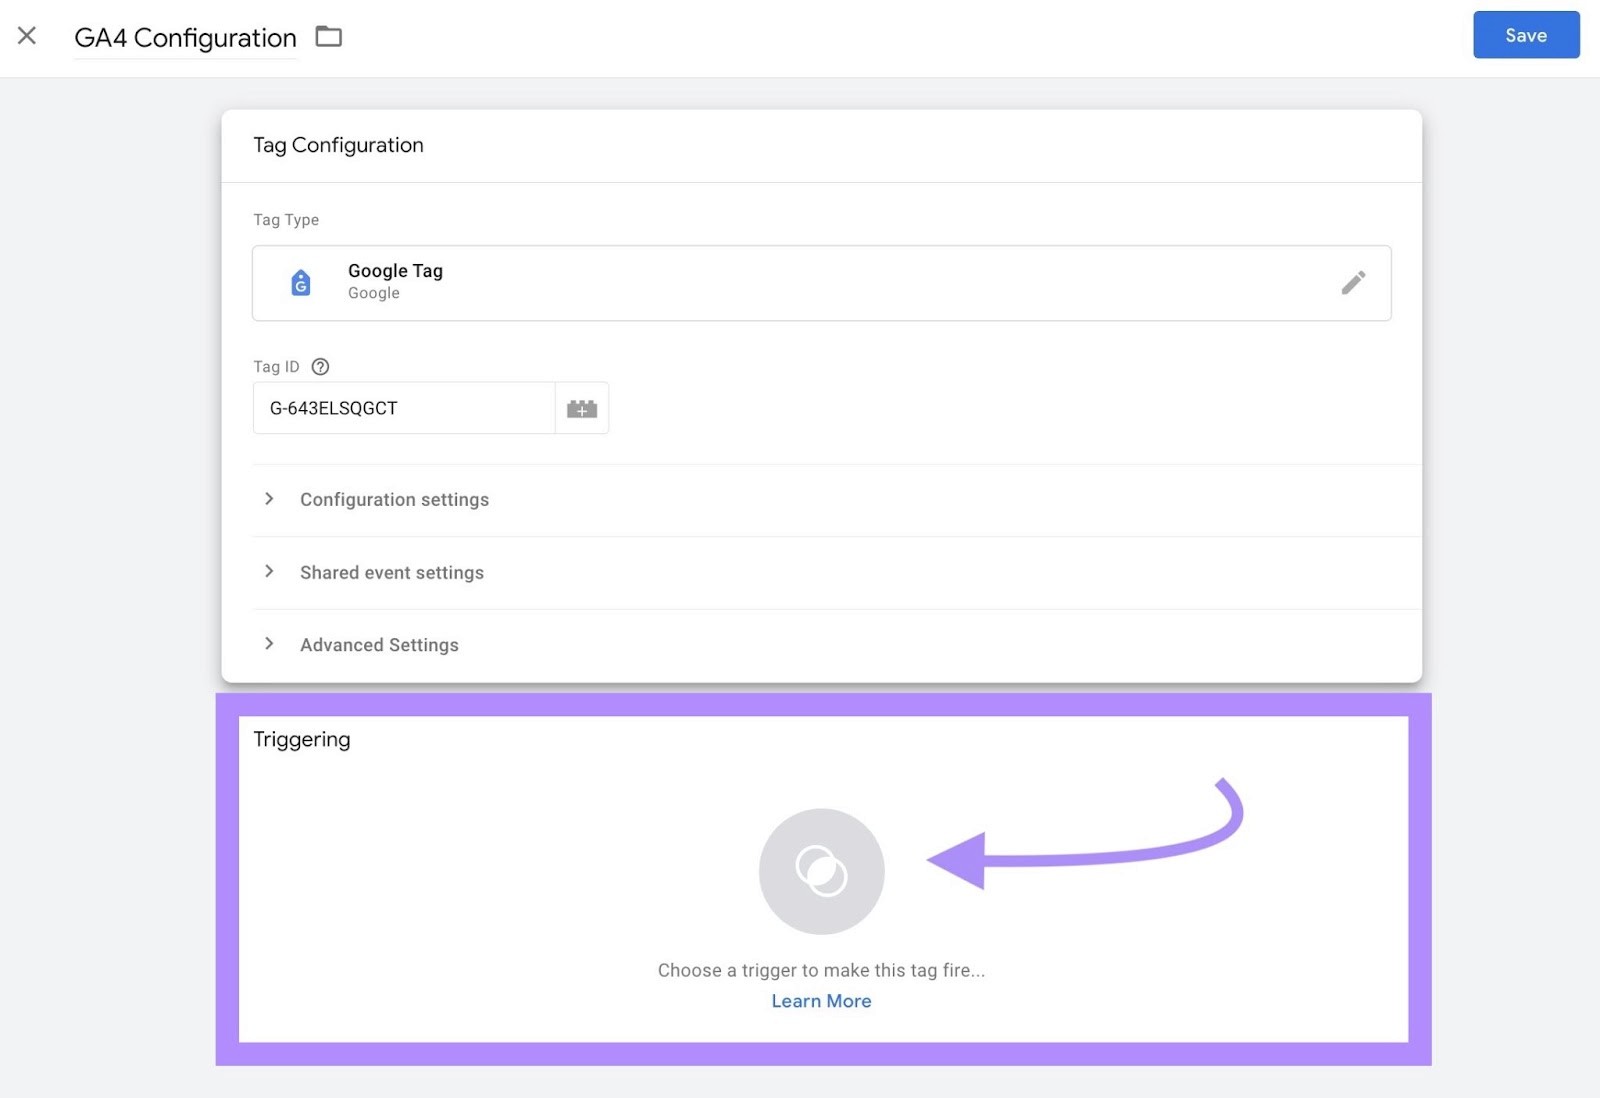
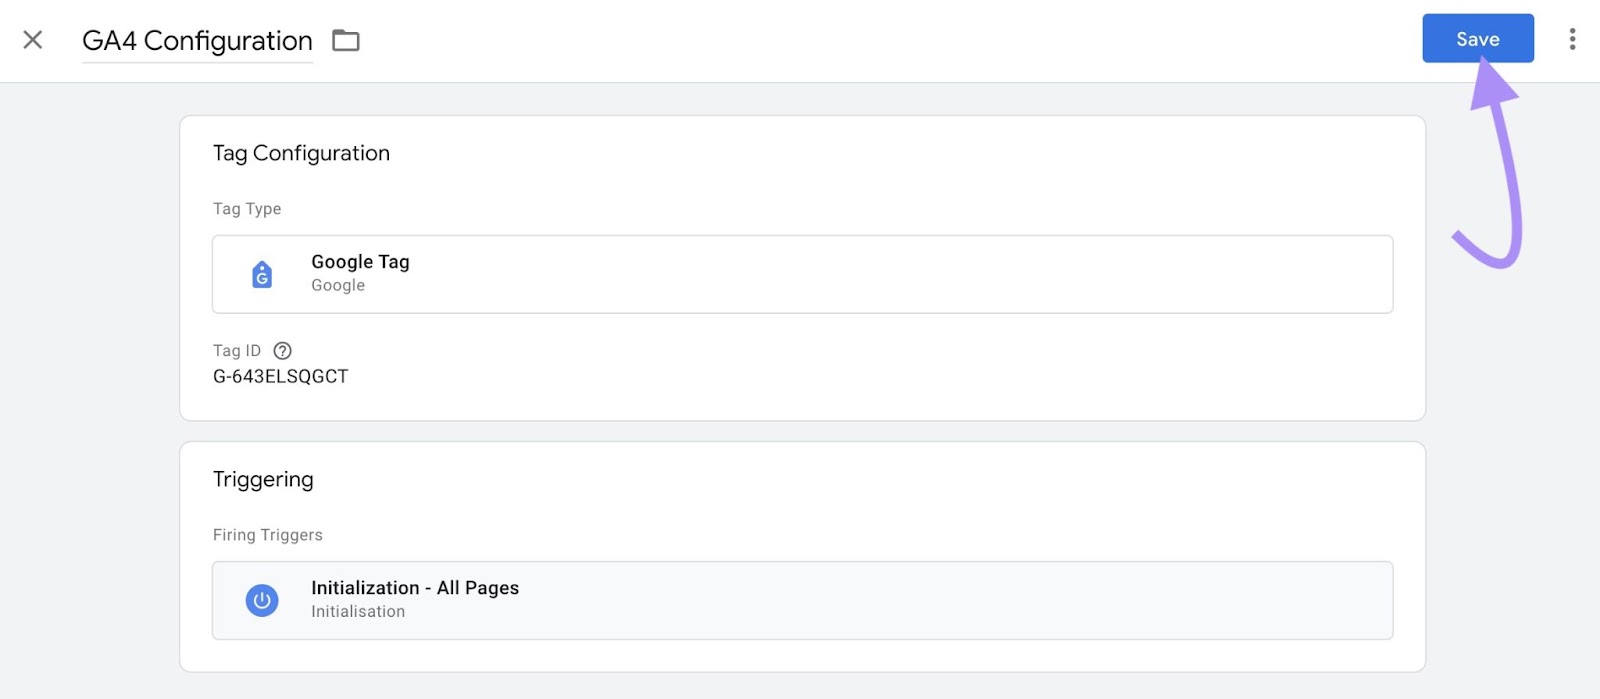
From the “Choose a trigger” window that slides in, select “Initialization - All Pages.” This is the standard GA4 trigger option, which will cause the GA4 tag to fire ahead of any other tags you’ve added to your website.

Click “Save” at the top of the tag setup window to save your new tag.
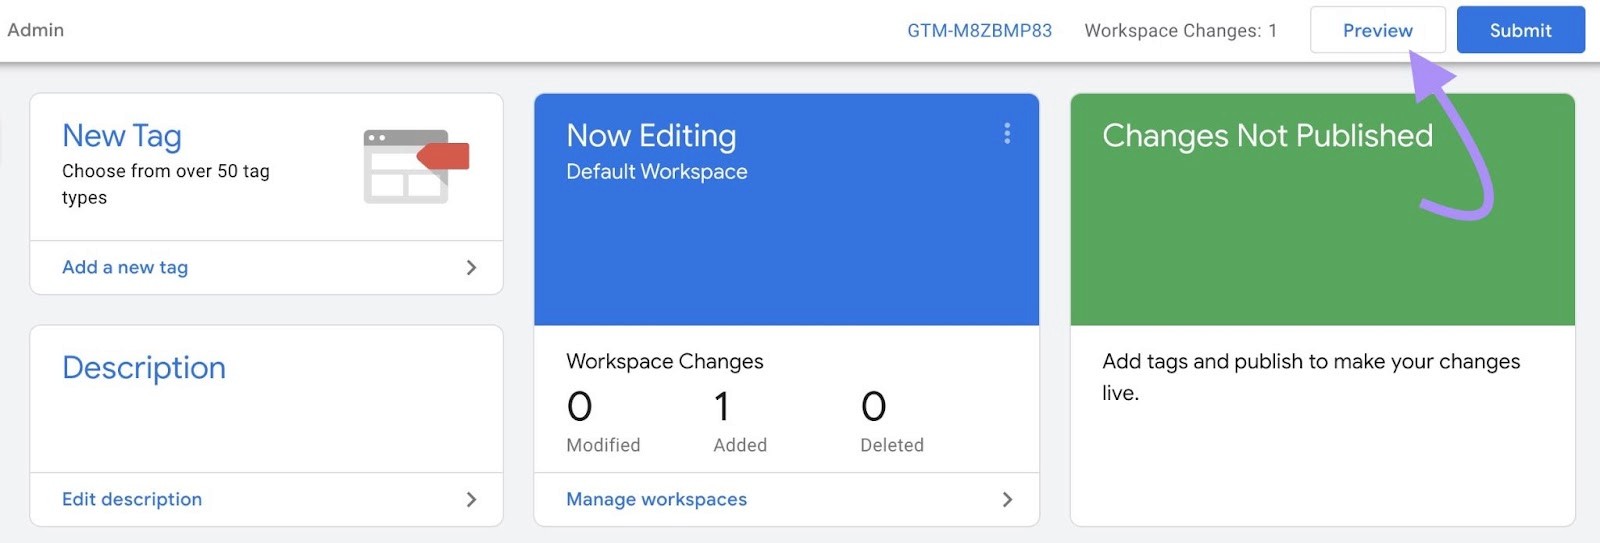
Next, test your GA4 tag by clicking “Preview” from your container’s workspace overview.
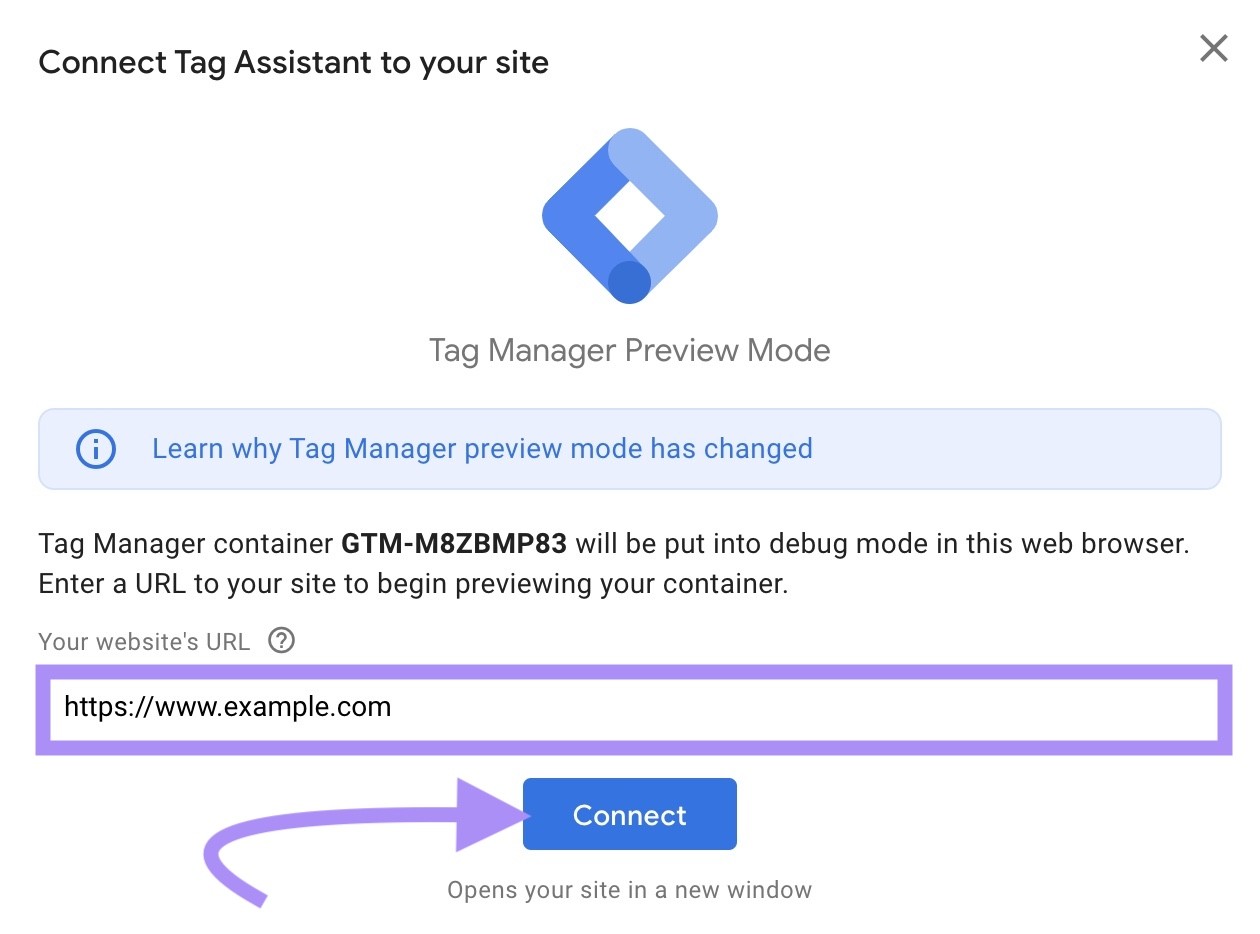
The Google Tag Assistant will launch in a new browser tab. Type your domain into the “Your website’s URL” field, then click “Connect.”
Your website will load in a new window. Leave that window open and go back to the Tag Assistant page.
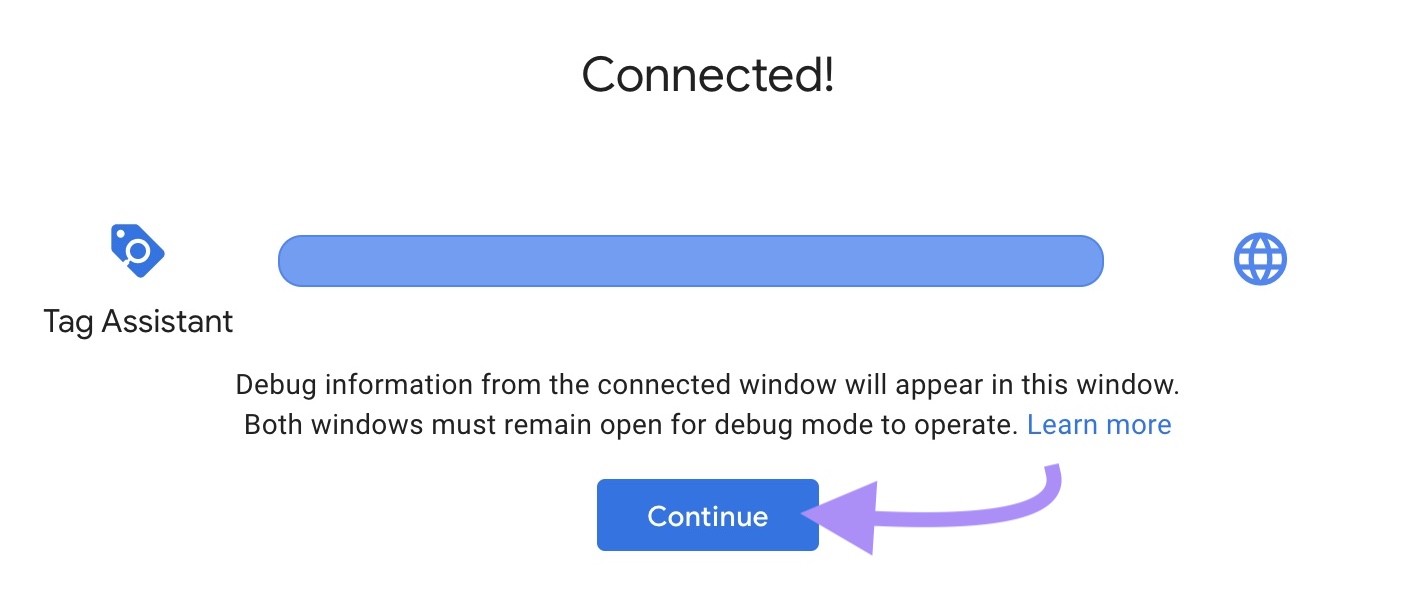
If Tag Assistant manages to connect to your website, a “Connected!” window will appear. Click “Continue” to close it.
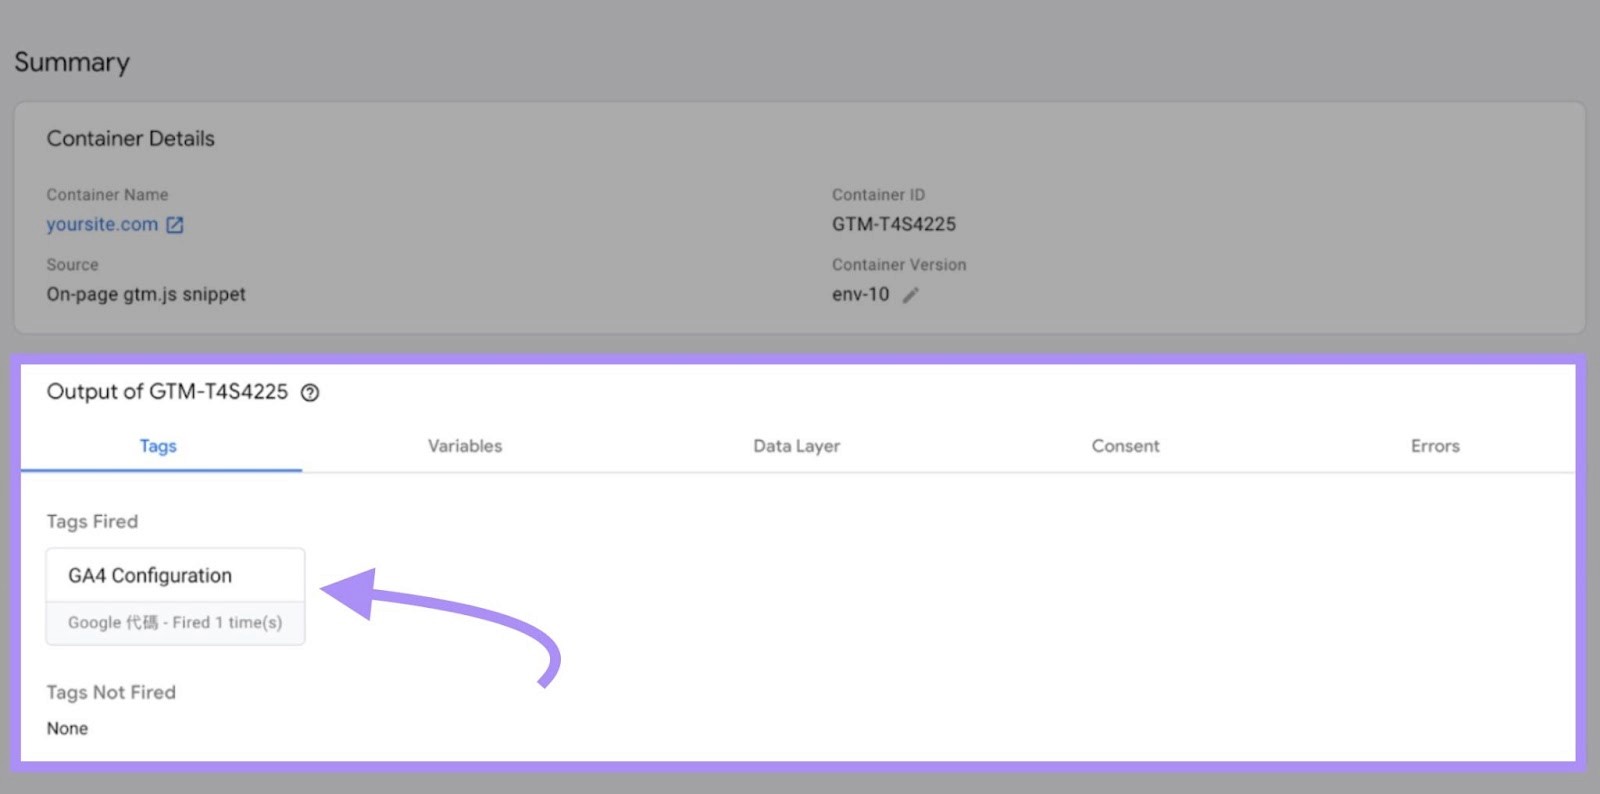
You will see your GA4 tag under the “Tags Fired” category of the “Output of [your measurement ID]” panel if GTM successfully loaded it.
If so, close Tag Assistant and your website. Then, click “Submit” on your container’s workspace overview to save the changes to GTM.
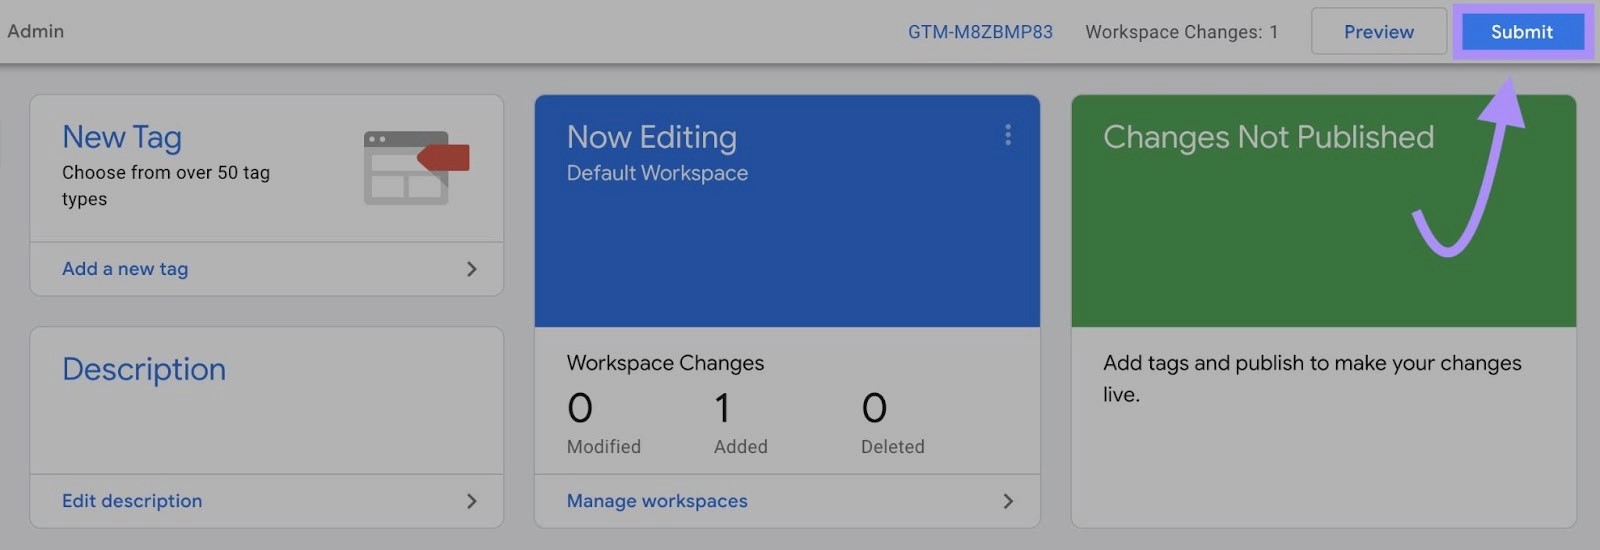
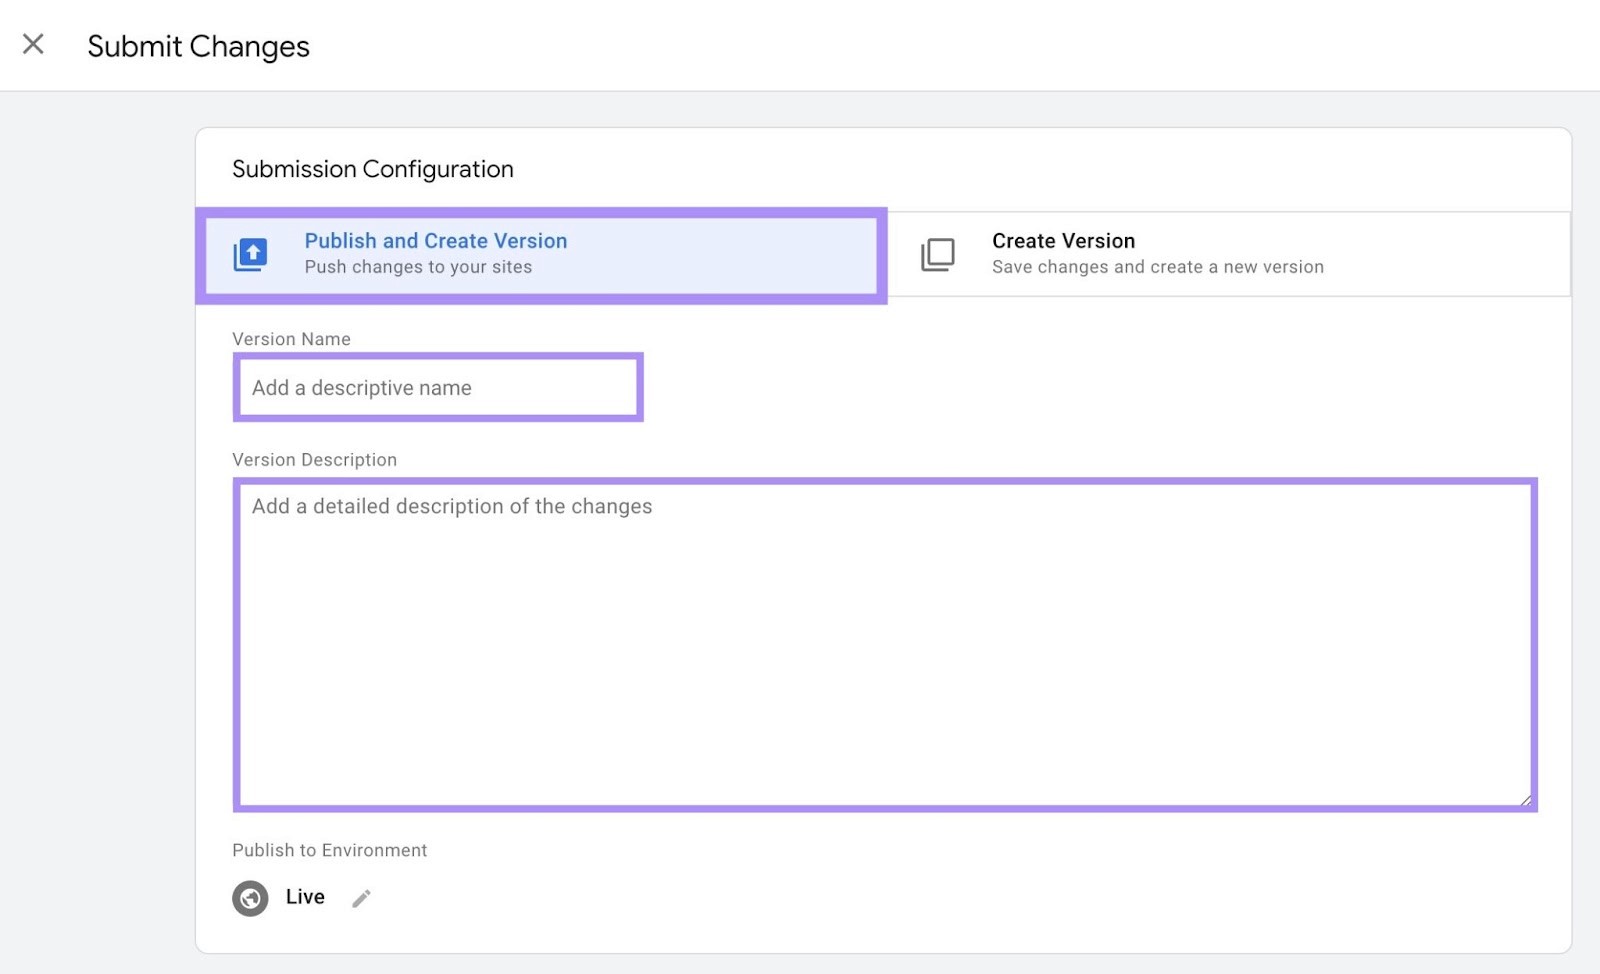
A “Submit Changes” window will slide in.
Leave the “Submission Configuration” setting as “Publish and Create Version.” After that, use:
The “Version Name” field to name the new version of your website (e.g., “GA4 installed”)
The “Version Description” field to provide details of your changes
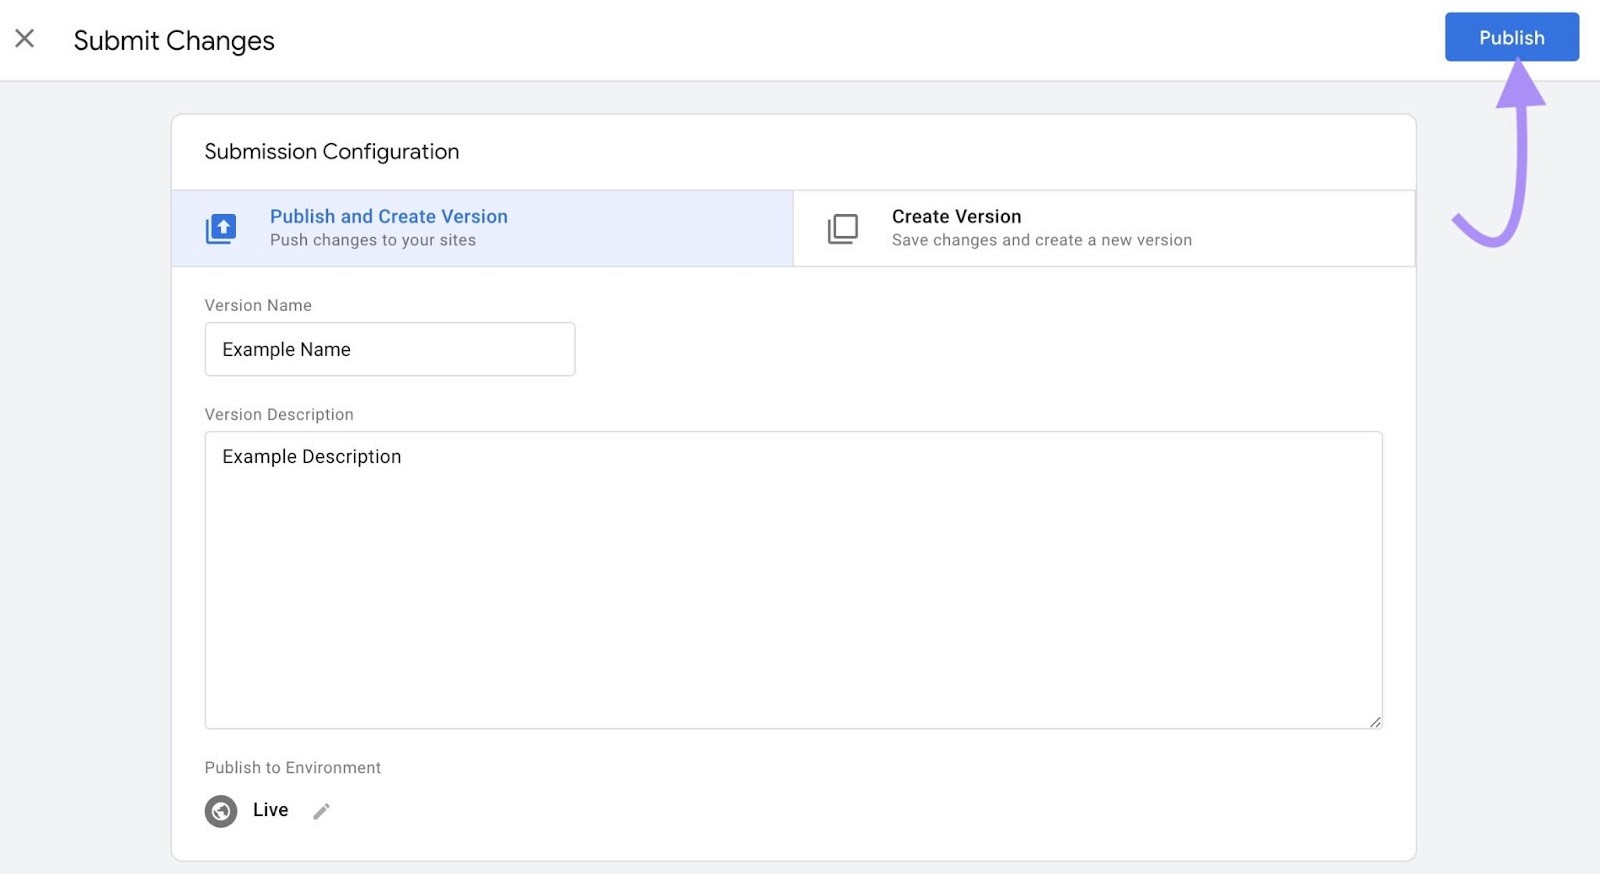
Finally, click “Publish” to make your changes to GTM live. And activate your website’s GA4 installation.
Native Integrations
Platforms like Wix and Squarespace come with built-in integrations for GA4. All you need to do is input your GA4 measurement ID, and you’re good to go.Manual Setup
For those of you who like getting into the nitty-gritty (or if your platform doesn’t support GTM), you can manually add the GA4 tracking code to your site’s HTML. Just make sure you paste it in the<head>section of every page for consistent tracking.
Why GA4’s Event Tracking is a Game-Changer
In the old UA days, events were kind of an afterthought. Now, they’re the center of attention. Every interaction, from clicks to form submissions, is recorded as an event, making it easier to track what really matters.
GA4 even gives you automatic event tracking for basic actions, like scrolling or video views, without you needing to configure anything. For more tailored insights, you can create custom events that track specific user actions unique to your business.
All of this data lives in the Engagement section under Reports, where you can analyze metrics like event count, users per event, and total revenue generated. Want to dive deeper? Custom explorations let you see exactly where users are dropping off or converting.
Maximizing Your Data: What GA4 Really Brings to the Table
GA4’s potential goes way beyond surface-level data. It gives you a 360-degree view of your audience, including their demographics, devices, and journey through your website or app. Imagine seeing every step a user takes—from landing on your homepage, to browsing products, to making a purchase.
With predictive insights, GA4 can tell you not just what’s happening now, but what’s likely to happen in the future. It’ll alert you when a user is likely to leave your platform or when a purchase is imminent. Armed with this information, you can make smarter decisions to keep users engaged and drive conversions.
Conclusion: Ready to Take Control of Your Data?
GA4 is your ticket to smarter, more actionable insights. The switch from Universal Analytics isn’t just about staying up-to-date; it’s about leveling up your entire approach to data.
With Strike at your side, this transition becomes even smoother. We’ll help you set up, track, and interpret all the rich insights GA4 offers—so you can focus on what you do best: growing your business.
Don’t wait—start unlocking the full potential of GA4 today and see the difference it can make.
Keywords
ga4, google analytics, step guide